Showing posts with label joe bagley. Show all posts

Thursday, May 19, 2011

Making my own road map

A very interesting and somewhat surprising thing has occurred since Craft Boston: I seem to be becoming a successful artist...who knew?

(warning, long post, but I hope an interesting one)

I'm at a crazy point in my life full of Big Decisions. To set the scene, I need to give you a bit of the backup story. Bear with me if you've followed this blog for long enough to know everything here, but I've gotten a TON of new viewers lately.

I started papercutting when I was 10. I did a summer program that had an art class that for some reason had a papercutting component. Basically we traced designs from DK stencil books and cut them with razor blades and hoped we didn't loose a finger. No real instruction, we just figured it out on our own.

When the program was over, I showed my mom the designs I made and she pulled out this book:
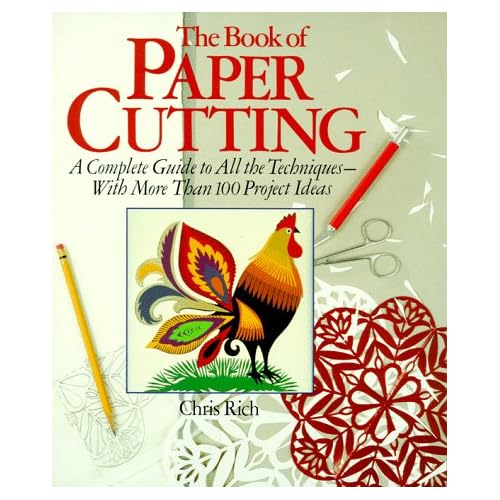

She owned a daycare that she ran out of our home and had tons of art and craft books for ideas to do with the kids. I basically copied every design from the book over the next 10 years, and essentially taught myself papercutting by just doing it for hours and hours.

Fast forward to college, I attended Boston University where I majored in Archaeology. During my Senior year, I started to papercut again based on some of the designs I saw on pottery and old art from my text books. I later got into photography and started making designs using my photos as references and developed my own style: highly detailed and "crinkly" for lack of a better term. Basically, I don't use very clean lines, deliberately, to better reference textures.

I have had several jobs in Archaeology since graduating in 2006, and have been papercutting the entire time. In 2007, I started selling on Etsy, just for fun, and the recession led to me and my wife (also an archaeologist) loosing our archaeology jobs. Since we both had the same qualifications and would be competing with each other, we decided that she should look for employment, and I would give the papercutting thing a go full-time.

At this time, I had started to challenge myself with very difficult designs and they started to gain some appreciation online and many sold. I was already making about as much as I was working, so making the transition to full-time art seemed to make sense giving our employment opportunities (or lack thereof)

Since 2007, I've been papercutting full time, and for a period I have also had a second full-time job as an archaeologist (May- Dec of 2010). I would create my designs from the hotel room I stayed in during away projects all around New England and would ship pieces during the weekend. I was honestly working about 80 hours a week and very much had two full time jobs.

I have never wanted to give up archaeology for art, but I never want to stop papercutting. After five years of trying and almost giving up hope, a few months ago I found out that I was accepted into a Masters Program at UMass Boston for archaeology.

About a week later, I showed my work at Craft Boston. That's where this story gets really complicated.

Craftboston was so beyond my wildest hopes for a successful show, and the sales that have occured directly resulting from the show have been almost as great. This "Art Thing" is doing really well. Really really really well. In my opinion, I'm a bonified successful artist right now. Not Warhol-successful, but for someone who cuts holes in paper and has no formal art background...

AND, I'm about to start a new chapter in the world of archaeology, with a couple potential jobs already on my radar. What to do?

Answer: Make hard choices. Apparently.

I've made the decision that I will be a professional archaeologist, a damn good one too, and also be a professional papercutting artist, one of the best ones in the world. Totally possible.

I never took a single art class after 8th grade so I have absolutely no idea what I'm doing. Fortunately I'm ambitious, have an amazingly smart and encouraging wife, and the internet and books exist, so I've been able to make it so far.

I have a few major archaeology projects this summer, but regarding the art I'm making the following choices:

1. Reduce the smaller 8x10 non-one of a kind pieces on etsy. Love designing them, love their price point and the income they generate, and I love having them as an option for my customers but they keep me very very busy and sometimes I don't have time to create larger more significant pieces. So, you may notice that my designs have decreased in number from about 120 to about 85. That number may go down again soon.

2. Raise the bar. For myself and all other papercutters out there. Bring it! I've recently completed two personal challenges. How small can I make a complicated design, and how detailed can I possibly make my designs.

Here's the small pieces:


^ Skyline of NYC

Micro Kissing on a bike, about the size of a nickle

Both were cut using a jewelers loop

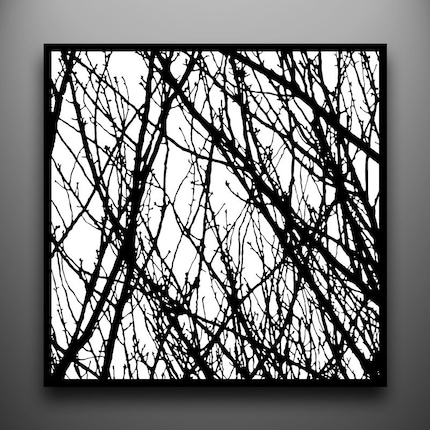
And here's a branch piece I'm almost done with. It uses a complete sheet of my black paper (30x20 inches) and is the largest size they manufacture this paper. It has about 20,000 holes in it. It will be at the Public Museum during the Grand Rapids ArtPrize competition. Not sure if I will pre-sell it since I have agreed to have it in the show. The price is $7,800. If someone is interested in purchasing it, please email me (Papercutsbyjoe@gmail.com) to discuss the sale. I am willing to split any potential prize money (up to $250,000) if it is purchased prior to the show.


Having finished both, however, I now know that I can't really do things smaller or more complicated. So, what to do now?

Make them BETTER and more interesting.

So, with that said, I'm setting out on a new path with my papercutting. My goal is to combine my detailed crazy-complicated designs, but with a bit less literal use of them. For example, instead of a bunch of branches, I've designed a large skull piece that is made exclusively of branches. The denser the branches, the more shading in the skull. Up close, it's a tangle of branches. From across the room it's a skull. I think you guys will really like it. I'm also working on two other versions of the same skull using Wycinanki style polish papercutting techniques and some other ideas. More of that to come as I finish them.

My new goal for my papercuts is to make a body of 10-15 large pieces, and find a gallery to show them. I really feel like this is the right direction for me. The larger more expensive pieces allow me to concentrate on design and execution of pieces.

I'm still trying to figure out how exactly to go about finding a gallery here in Boston. I may start in Portland, ME where I grew up. Great art scene, and possibly a bit easier to find a gallery. I've sold a ton of pieces now for between $1,000 and $5,000 so I know there's a proven market. Just need to raise the bar a bit more in this next batch. Reading a ton of books on art careers. Wish I had made those important connections you get in art school, but there's plenty of ways to skin a cat, and perhaps not having a clue what I'm doing is charming, right? We'll see.

Here's my reading material:
and


This can't hurt, so here goes: If you're a gallery and like my work, contact me (papercutsbyjoe@gmail.com). I have design proofs of some of the pieces I'll be making for the body of work.

I have no idea how far I can take this. My work really doesn't have a "message", it isn't political, and I never want it to be. I'm hoping people and Art People can recognize it for what it hopefully is: Something beautiful, visually interesting, and mind-blowingly cut from paper.

If you aren't a gallery, keep coming back, follow my facebook page (updated often) and hang on for the ride! I have no idea where it is going but I'm working my ass off to make it as successful as possible!

Thanks for making it to the end of this really long post, I appreciate it.

Thursday, April 7, 2011

Craftboston: A review


Summary of Craftboston: Wow.

It's been almost two weeks since Craftboston, and I'm just getting back to the blog to talk about this. I'm finally recovered from the rush, and I'm ready for my next huge event, which will happen on Friday, April 8th. And no, I'm not telling you what is happening, but you'll definitely know when it happens. It's that big.

Anyway, back to Craftboston.

The show was HUGE, an entire convention center full of awesome. Seriously, I was in awe of my fellow vendors and so happy and surprised I was invited to join them.

Setup went very smoothly, however time absolutely flew by, and before we knew it we were only 2/3 done and had been there for a full seven hours! The trees looked great, and were easier to install than I had planned, though very time consuming. The drapes looked great and the lighting was well worth the investment!
I was very fortunate to have one piece sell the week before the show (Water). This worked out well in two regards: The first, it took away most of the pressure to sell like crazy at the actual show. The second was that I had digitally planned for (and created) 9 pieces, but the column in our booth took up the space of one of my pieces, so I only had 8 slots. Worked out perfectly.

VIP night came on Thursday and the very first person in my booth fell in love with my most complicated piece and purchased it. In the first 10 minutes of the show. Before it opened to the public. Yeah. It set a new artist record for my work as well.
Needless to say, it was amazing from that point on. I couldn't keep any small pieces in the booth and completely voided my studio/apartment of pieces to restock each day. In the end dozens of small pieces found new homes, and one of the show pieces was purchased (the one that sold at the beginning). Two if you count the sale the week before the show.

The thing that made me most happy, though, was how many people immediately "got" what I do and truly appreciated the work that goes into these pieces. I think being in a craft show, and being one of the few wall art booths immediately made people look at my work (which usually looks like prints or silkscreens) and think..."there must be something more going on here". I also put up a sign that simply read "Hand-Cut Paper Art" and that definitely got peoples interest.

The crowds were great. A few times I had to leave the booth and stand in the aisle due to the number of people in my booth. I had a blast! The show organizers were incredibly kind, my lecture went great, and moveout went smoothly. I really look forward to applying for next year!

All the pieces are now available on Etsy, so if you've been dying to have one of my best pieces, here you go:

Thursday, February 24, 2011

Craftboston Preview

Hi everyone,

I just finished the last of the nine piece I have created specifically for Craftboston, March 25-27

I thought I would show you all some photos of the unmounted pieces just before I mounted and framed them. I will be showing these and many more photos as a slide show running on my laptop during the show.

If you would like to see the pieces in-full, join my facebook page here: http://www.facebook.com/papercutsbyjoe I've posted photos of all nine pieces in their entirety.


Monday, August 9, 2010

Gearing up for Art in the Park


One week away!

Please join me if you can this Saturday, the 14th in South Portland, ME's Mill Creek Park for the 31st annual Art in the Park!

I'll be showing 75 pieces, about 35 of which are framed, the others are unframed, and very inexpensive. Figured I'd bring a bunch of pieces people can easily carry away, and a couple really WOW pieces for those with deeper pockets.

This is one of my most successful shows, and I've got high goals this year (bringing over $6k worth of merchandise).

Here's the tent plan so you know what to look for when you get there. Had a blast making this, and it really helps me relax to know I've essentially got a map once I get there.

Monday, March 22, 2010

Guild of American Papercutters

You are now reading the blog of the newest member of the Guild of American Papercutters Board of Directors, the largest organization of papercutters in the western hemisphere.

I received word of my nomiation from Marie-Helene Grabmanm, the president of the Guild, about a week ago and just heard last night of my unanimous acceptance onto the board.

I very much look forward to being an active participant in the Guild's growth and I am truly honored and flabbergasted that I was even considered!

To find out more about the GAP, to become a member (we publish a quarterly magazine with new art, history, and news from around the world), and to see the work of local and international papercutters, visit their site at www.papercutters.org

Saturday, March 20, 2010

Microcuts

I get up at 6:45 every morning and start work some time around 8. Typically I spend part of the morning catching up on emails and The Internet, then I cut or design for people, break for lunch, then finish cutting, package new pieces, trip to the Post Office, return, email people who emailed me while I was at the Post Office. THEN sometime around 3:30, with 30 mins before my wife gets off work, I have this creative time that is MINE ALL MINE!!!

Well, lately that time hasn't been exactly enough time to work on a large 18x24 of a famous Boston landmark I started weeks ago and have gotten almost none of it finished, so instead, I've been focusing on smaller projects I stand a chance of finishing the same day I start.

Inspired by the creative geniuses over at etsy, including kfarrell, creater of tinysaurs, which I have miniature collection of, I decided to go small.

The wonders of the computer combined with the printing ability of laser printers, I realized I had everything I needed to shrink down an original design to mind-numbing porportions. SO, with a Sunday evening filled with Jen madly trying to finish a monstrous reading assignment (studying for her MA in Historical Archaeology- aren't we so interesting?) I dug through a bunch of photos looking for an appropriate idea.

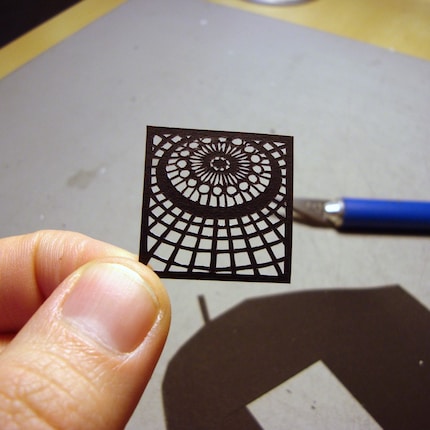
I settled on a photo I took of the Chicago Library domed Tiffany glass celing during our trip to that amazing city last August.

I figured I should probably start with a size that made some logical sense, so I chose one square inch, popped the new design into photoshop, and Ta-Da!


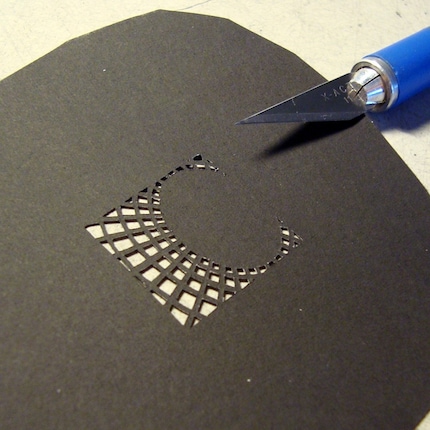
I started cutting, and quickly realized I couldn't use my usual swivel knife as it wanted to move a bit too much for the delicateness of the design (wanted to twist and turn when I was cutting a 1mm thick straight line), so I switched to my usualy #11 blade/knife. Here's a progress shot:

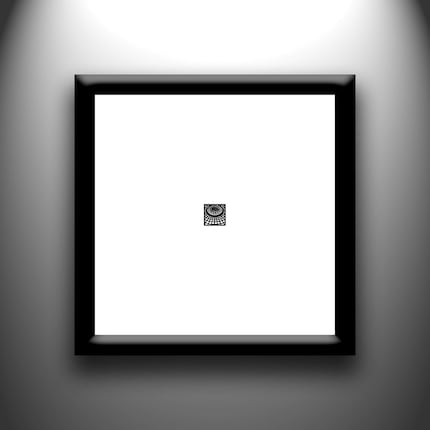
Once finished, I mounted it to a 12x12 inch background to give it some presence on the wall and framed it up but good. Here it is unmounted and finally framed:


AND, if you are so impressed, you can even purchase the $65 framed original piece here on etsy.

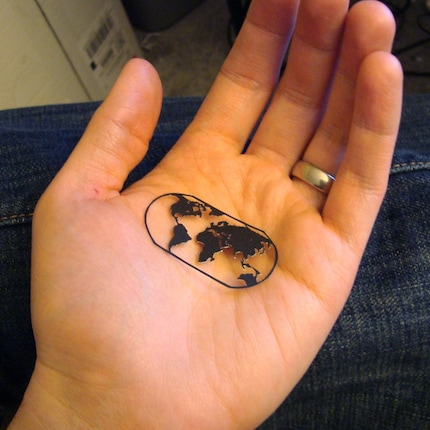
After completing that and getting lots of "oohs and Ahs" I felt pretty good about the decision to go small and immediately started thinking of new ideas. Apparently this is harder than it looks to go so small because I've had a hard time coming up with ideas for interesting, cutable designs. I soon thought of the world map, since I was working on the Continent papercut designs.

I had to subtly modify the map a bit (bring the two hemispheres a bit closer together) but in the end, I was really happy with the design, which measures 1 x 1.75 inches huge.


Apparently it was a really awesome design because it was on Etsy a whole 6 hours before getting snatched up and now lives in a great home in Missouri:)

Like I said before, I'm struggling to come up with designs that would both look interesting small, but also be physically cut-able. Here are some recent experimentations that I love, but I'm not listing yet as I'm hoping to do even better.


I am working on a 1x1" version of this piece, which now hangs in a private collection in London:


About 1/3 done as you can see


Okay, that's it for now. If you have brilliant ideas for microcuts, do tell, do tell. And, speaking of telling, I have some very exciting news that will be confirmed at 10am today, after the confirmation, I'll be back with a nice announcement:)

Tuesday, February 16, 2010

As Seen on TV

So Saturday was my big TV debut. Well, my artwork debuted on tv, not me, but it's better looking anyway.


I was contacted at the end of January by Lindsay Roberts, an Advertising Assistant for Good Housekeeping Magazine and blogger, who writes the blog Gift Giving With Love

I made a custom silhouette for her parent's anniversary based on an old photo from their wedding.

She regularly makes appearances on Fox News in Detroit to show great gift giving ideas, and this Valentine's Day she showed the silhouette I made for her and her parents. Very exciting! The video is below (I'm about 3:30 into it)


Lindsay did a phenomenal job on the presentation, I can't imagine staying composed on TV! Thanks so much Lindsay for finding me and showing my work!

Go check out her great blog, if you haven't already: Gift Giving With Love

Sunday, February 14, 2010

Papercutting tips: Guide to paper

Like the adhesive post, this post is also focused mostly on one product, but I'll include some helpful tips afterwards for picking out good paper.

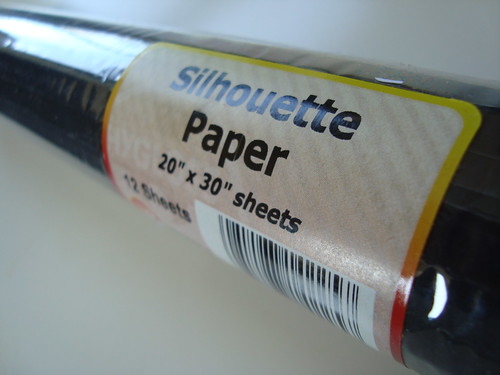
I use, pretty much exclusively, Hygloss Silhouette paper from DickBlick: http://www.dickblick.com/products/hygloss-black-silhouette-paper/

I buy it in rolls of twelve 20x30 sheets, and depending on how busy I am they last about a month or two.

Silhouette paper from Blick in the roll

An un-cut sheet of silhouette paper

This paper is incredible! It is actually white paper that has been covered in a thin layer of matte-black paint. This is good for two reasons: 1, you have one side that is white so you can draw a design on it, and 2. because it's painted, there is less chance of the black fading over time. More about that later.


The "white side" of the paper

I work from the white side of the paper, which means that when I'm done, my designs get flipped around. This is very important when you work from the white side! If you are doing anything that can not be backwards (text, recognizable architecture, etc) you will need to cut your design backwards. In my case, I always create my designs in the computer (easy to resize, tweek, and otherwise mess around with my original designs before cutting them), so before I start cutting I flip my designs backwards, print them as a pattern, and adhere them to the white side of the paper with a bit of light-tack spray adhesive from Krylon

When I finish cutting the design, I peel off the pattern and flip the silhouette paper over to the finished black side.

One draw back of this particular paper is that it does come very tightly rolled, so the paper has a lot of curl to it when you first open it. I have a very large wooden shelf-like thing that store my unrolled paper in. I put the sheets of silhouette paper between two larger sheets of regular paper and then put something heavy on top to hold the paper flat. In about a week most of the curl is out of the paper, but the first few sheets really want to roll while you're working with them.
Another minor drawback is that because it's painted, not dyed, it doesn't like to be folded. The paint doesn't crack, but you can definitely see the white try to peek through the black along the folds. Also creasing the folds can lead to abrasion of the paint and wear it through to the white.

Don't iron them! I tried this and it made them kind of wavy even without steam. Not sure why. Just press them between something heavy.

Okay, that all said, here are some more general tips on picking out paper:

- Acid free and Lignin free are EXTREMELY important! Can't stress this enough. The natural acid and lignin found in most wood/paper needs to be removed or your paper will discolor, become brittle, and possibly simply fall apart over time. Look for fade-resistant paper (should be labeled as such) if you are using non-white paper. The paint on the sihouette paper is much less likely to fade as it is more light-fast

-Thin is good, but too thin is a nightmare. You want the paper to be easy to cut, but not so fragile that you are constantly tearing it. I recommend not going much past 70 pound paper unless you want a really good hand cramp.

-Texture is very important. You want the paper have very tiny fibers in it. If the fibers are too large, your corners and areas where the paper isn't cut completely through will have stringy bits of fiber sticking out of them. This is a huge pet peeve of mine and, in my opinion, a very good indication of the quality and skill of a papercut. You want all your edges, corners, and cuts to be clean with very little overcutting (cutting beyond the intersection of two lines). Hand-made paper is beautiful and I would love to work with it, but it's extremely fibrous. I'm not above tearing a 2mm tear in the edge of paper to see how clean it is, but you can usually tell just by running your hands on the paper. The less texture, the smoother the paper, the better.

Some paper is actually died after it is rolled, whereas with others, the pulp of the paper is dyed first before being rolled. Very hard to tell which it is when you are looking at it, but the pulp-dyed paper has a more thorough dye-job and though it will fade, it will appear to fade slower as there is more dye throughout the paper.

Finally, and probably most important to your paper looking good over hundreds of years, you should frame ALL your papercuts. All of 'em. These buggers are dust magnets and are too delicate to easily clean. Always use UV glass, which will help block some of the damaging ray of the sun from fading or otherwise altering your paper. Keep the paper out of direct sunlight, and away from exterior walls (walls where the other side of the wall is the outdoors) unless your house is very well insulated. The temperature changes of exterior walls aren't terribly bad for your paper, but the more stable you can keep your piece (heat, light, moisture, etc) the less likely your piece will deteriorate over time. Think about mummies: deserts are always dry and pretty much the same weather all the time= preservation. Submerged wooden ships stay in pretty good shape because they are always wet and about the same temperature. Fences in New England, where the weather is always changing and there is about a 100 degree range of temperature throughout the year rot.

Wednesday, January 27, 2010

Terminal 22 Papercuts Show

Just sharing the announcement for the Terminal 22 Papercuts Show including seven of my pieces:
If any of you happen to be over in the San Francisco area, please attend the show and let me know how it goes. Unfortunately I won't be able to make it!